LC 00799: verschil tussen versies
Geen bewerkingssamenvatting |
Geen bewerkingssamenvatting |
||
| (39 tussenliggende versies door dezelfde gebruiker niet weergegeven) | |||
| Regel 5: | Regel 5: | ||
* Participant connections, e.g. the average number of connections people have to others, the average number of connections that participants use for health advice, the strength of the connections and how often people interact with their connections. | * Participant connections, e.g. the average number of connections people have to others, the average number of connections that participants use for health advice, the strength of the connections and how often people interact with their connections. | ||
* Connection types, e.g. friends, family, neighbour, work colleagues etc. | * Connection types, e.g. friends, family, neighbour, work colleagues etc. | ||
More advanced analyses can be applied to the data collected via HAIRE's SNA surveys (paper or app version). If users require more in-depth analysis, we | More advanced analyses can be applied to the data collected via HAIRE's SNA surveys (paper or app version). If users require more in-depth analysis, we advise collaborating with professionals that have SNA expertise. HAIRE's SNA expert was Professor Arunangsu Chatterjee, University of Plymouth, UK (email: arunangsu.chatterjee@plymouth.ac.uk). | ||
Links to Sociometric (app versions and web-browser version) can be seen below. | Links to Sociometric (app versions and web-browser version) can be seen below. | ||
| Regel 34: | Regel 34: | ||
As seen above, you can select the language required at the bottom left of the screen. If it is your first time using the app, someone in your organisation will need to act as an administrator and register your location. We recommend that this administrator is also the first person that conducts the SNA survey in your location, as the survey will begin once the details (for registration) outlined below are provided. | As seen above, you can select the language required at the bottom left of the screen. If it is your first time using the app, someone in your organisation will need to act as an administrator and register your location. We recommend that this administrator is also the first person that conducts the SNA survey in your location, as the survey will begin once the details (for registration) outlined below are provided. | ||
New locations can be registered via the | New locations can be registered via the dropdown menu that is labelled '''Location'''. Select the '''New location (not listed)''' option and the following screen should appear: | ||
[[Bestand:New location registration.jpg|gecentreerd|kaderloos|550x550px]] | [[Bestand:New location registration.jpg|gecentreerd|kaderloos|550x550px]] | ||
| Regel 51: | Regel 51: | ||
=== Step 3: Conducting the SNA survey using Sociometric === | === Step 3: Conducting the SNA survey using Sociometric === | ||
Once the administrator for a location undertakes Step 2, they are ready to conduct the survey with their location's first participant. | Once the administrator for a location undertakes Step 2, they are ready to conduct the survey with their location's first participant. | ||
The survey in Sociometric is based on the paper version that is available via this Wiki's main page on SNA ({{Cite|resource=Resource Hyperlink 01276|name=link to SNA main page|dialog=process-linkwebsite-dialog}}). | The survey in Sociometric is based on the paper version that is available via this Wiki's main page on SNA ({{Cite|resource=Resource Hyperlink 01276|name=link to SNA main page|dialog=process-linkwebsite-dialog}}). | ||
In Sociometric... | In Sociometric... | ||
'''Q1 asks for the | '''Q1 asks for the participant's demographic information, e.g. age, gender and marital status.''' A series of dropdown boxes can be used to enter the relevant information for a participant. Once each box is completed, Q2 appears when the green arrow button (usually in the bottom right corner of the screen) is clicked. | ||
'''Q2 invites participants to think about the individuals whom they interact with in their local area, e.g. friends, family, neighbours etc.''' A series of questions, including the initials of the people mentioned by the participant, can be completed. In total, there are eight questions to answer for each person. They appear as shown below: | '''Q2 invites participants to think about the individuals whom they interact with in their local area, e.g. friends, family, neighbours etc.''' A series of questions, including the initials of the people mentioned by the participant, can be completed. In total, there are eight questions to answer for each person. They appear as shown below: | ||
[[Bestand:Survey Q2.jpg|gecentreerd|550x550px|kaderloos]]More individuals can be added via the '''Add another''' button that can be found at the bottom of the page. The '''Add another''' button can be seen below: | |||
[[Bestand:Add_another_button.jpg|300x300px]] | |||
After the participant has listed everybody that they wish to, Q3 will appear when the green arrow button is clicked. | |||
'''Q3 is about the sources of information that participants use to get information, e.g. about local events.''' Sources of information can be listed under four categories: ''i) local individuals, ii) offline or online media, iii) local services and organisations and iv) other''. Under each category, the information sources that a participant uses can be written down and then saved by clicking the green + symbol that appears when a box is filled. See below an example - ''note: the green + symbol appeared beside the second box, as 'Facebook' was written as an answer for that category.'' | |||
[[Bestand:Survey Q3.jpg|gecentreerd|550x550px|kaderloos]] | |||
Click the green button to move on to Q4. | |||
'''Q4 asks about key people in the local area who seem to know everyone and are good at bringing people together'''. Individuals can be added as a response by entering their name or initials (we recommend using initials for ease in terms of data management and privacy) and whether they have a formal role in the local community. If they do not, write '''None.''' As in Q3, a green + symbol will appear once the relevant boxes are completed. Then, more individuals can be added in the same way. See below for an example: | |||
[[Bestand:Survey Q4.jpg|gecentreerd|kaderloos|550x550px]]When everyone relevant is added as a response, the green arrow button can be clicked to move on to Q5. | |||
'''Q5 is very similar to Q4 and relates to individuals who have power and/or influence in the local community.''' Answers can be entered in exactly the same way as for Q4 - see the image above. | |||
'''Q6 asks about the local groups and clubs that the participant attends.''' Answers can be written in the box that appears on the screen and saved by clicking the green + symbol. Multiple responses can be added in the same way, see below: | |||
[[Bestand:Survey_Q6.jpg|gecentreerd|kaderloos|550x550px]] | |||
'''Q7 involves local groups and clubs that the participant would like to attend but does not currently.''' Answers are entered in exactly the same way as for Q6 - except a reason for not attending must be completed before the green + symbol appears. Once more, the green + symbol is used to save each answer and multiple responses can be entered. | |||
If there are no such local groups and/or clubs, '''None''' can be written in both boxes that appear under Q7 and the answer can be saved in the same way as described above. | |||
Q7 is the survey's final question. After Q7's answers are saved, the following screen will indicate that the survey is complete once the green arrow button is clicked: | |||
[[Bestand:Survey_Complete.jpg|gecentreerd|kaderloos|550x550px]] | |||
Each person conducting a survey for your area will be able to do so by finding their relevant location on the survey's landing page (see Step 2), entering their ID number (under '''Volunteer ID''') and the new participant's ID number (under '''Participant ID'''). Each survey completed for a location will contribute to the location's autogenerated SNA summary, which the administrator (see Step 2) will be able to access using their Sociometric account at any point. The next section (Step 4) describes how a location's administrator can access their location's SNA summary and the data set that has been generated by all of the surveys for that location. | |||
=== Step 4: Accessing a location's SNA analysis and survey data === | |||
A location's administrator will be able to access their location's auto-generated SNA analysis by logging on to their Sociometric account. Step 2, above, outlines how to register for an account. | |||
Administrators can log on to their account via Sociometric's landing (home) page. Account details (registered email address and password) can be used to log on to the relevant account by clicking on the button shown below: [[Bestand:Log-on symbol.jpg|geen|miniatuur]] | |||
Once the administrator uses their details to log on, they will see the following page: | |||
[[Bestand:Sociometric Analysis Landing Page.jpg|gecentreerd|kaderloos|500x500px]] | |||
On the page above, the administrator will be able to select their location via the dropdown menu labelled '''Location''' (top right of screen). When the relevant location is selected, the screen will show a series of tables that summarise the following information: | |||
* Demographic information, e.g. age, gender etc., for all participants. | |||
* Participant connections, e.g. the average number of connections people have to others, the average number of connections that participants use for health advice, the strength of the connections and how often people interact with their connections. | |||
* Connection types, e.g. friends, family, neighbour, work colleagues etc. | |||
Additionally, paragraphs that summarise the data shown in the tables will appear on the left of the screen. For example, the paragraph summarising the demographic information of a location's participants will read like the sample below: | |||
'''''The highest gender category of participants was Female, with 1 participants representing 100.00% of participants. The majority of the participants were aged between 66-70, with 1 representing 100.00% of participants. 100.00% of participants were Widowed, 0.00% of participants were Prefer not to say & Other & Divorced & Separated, but still legally married & Married & Single.''''' | |||
'''''0.00% of participants considered themselves to have a disability and the majority of participants were from a Mixed or multiple ethnic groups (Includes any mixed background) ethnicity.''''' | |||
Similar paragraphs (to the one above) are generated for participant connections and connection types. | |||
The account page can also be used to extract all of the data for a location in various formats. Data extraction can be useful for performing more sophisticated analyses on the data that are collected. ''Note: we advise data extraction for further analysis only if users are able to work with SNA experts.'' | |||
An administrator will be able to extract their location's data if they click the '''Export''' button at the top of the page that shows a location's basic analysis (as described above). The following page will appear: | |||
[[Bestand:SNA Data Extraction.jpg|gecentreerd|kaderloos|500x500px]]Data are available for extraction across three categories. | |||
# '''Edge List (as show in the example above):''' this category relates to the relationships that participants have in their local area. | |||
# '''Attribute Table:''' this category relates to participants who are involved in local community groups. | |||
# '''Demographic Table:''' this category relates to all of the demographic data that has been collected. | |||
The administrator will be able to extract data relating to the three categories listed above by clicking the download button under each category. The download button is shown below: | |||
[[Bestand:SNA Download Button.jpg|137x137px]] | |||
Data can be extracted in the following formats: JSON, CSV, TXT, SQL and MS-Excel. | |||
{{Light Context | {{Light Context | ||
|Supercontext=LC_00823 | |Supercontext=LC_00823 | ||
Huidige versie van 31 aug 2023 om 20:17
Note: This page is in development and may not be complete.
This section outlines how future users can use HAIRE's web-based tool and/or app, called Sociometric, to process Social Network Analysis (SNA) data. The tool is available in English, French and Dutch, and provides basic analysis - including:
- Demographic information, e.g. age, gender etc., for all participants.
- Participant connections, e.g. the average number of connections people have to others, the average number of connections that participants use for health advice, the strength of the connections and how often people interact with their connections.
- Connection types, e.g. friends, family, neighbour, work colleagues etc.
More advanced analyses can be applied to the data collected via HAIRE's SNA surveys (paper or app version). If users require more in-depth analysis, we advise collaborating with professionals that have SNA expertise. HAIRE's SNA expert was Professor Arunangsu Chatterjee, University of Plymouth, UK (email: arunangsu.chatterjee@plymouth.ac.uk).
Links to Sociometric (app versions and web-browser version) can be seen below.
Apple App Store Version: Sociometric on Apple App Store
Google Play Store Version: Sociometric on Google Play (for Android devices)
Web-browser version: Sociometric (for use on a web-browser)
The next sections cover how HAIRE's SNA app and web-browser tool, Sociometric, can be used.
Step 1: Administrative considerations
A series of administrative actions need to be considered before the SNA survey is applied with Sociometric, see below.
- An important point to consider is data management and participant privacy. The data in Sociometric is stored securely. However, it is required (by law) to gain consent from participants around the following points: i) who will have access to their data; ii) how their data will be used; iii) that they do not have to answer questions that they do not wish to; iv) that they can ask for their data to be deleted at any point - data can be deleted in Sociometric by the administrators, described in Step 2 (below), for each location and v) how long their data will be stored. Participants should consent to all points in bold before they take part.
- Additionally, before conducting the survey, we recommend that the individuals who are tasked with applying the survey build positive relationships with potential participants. For example, in HAIRE, the SNA survey was applied after participants had undertaken a Guided Conversation. The Guided Conversation was used to build trust and get to know more about the participant. More information on relationship building can be seen via this Wiki's page on Tips and Training about the Guided Conversation, see here: Guided Conversation Tips and Training
- Individuals conducting the survey should be given an ID number, as there will be space (labelled Volunteer ID) to input this number in Sociometric when they are ready to conduct a survey. Make sure everyone has a unique number.
- Participants will also need to be assigned an ID number. Make sure each participant's number is unique. This number must be entered into Sociometric (under Participant ID) to begin a survey. Note: If using HAIRE's Guided Conversation as well as the SNA survey, it may be useful to assign participants the same ID number for their Guided Conversation and their SNA survey.
Once the points above are addressed, an administrator will need to register and set up a location (where the survey will be conducted) in Sociometric. Step 2, below, outlines the registration process.
Step 2: Language selection and admin registration
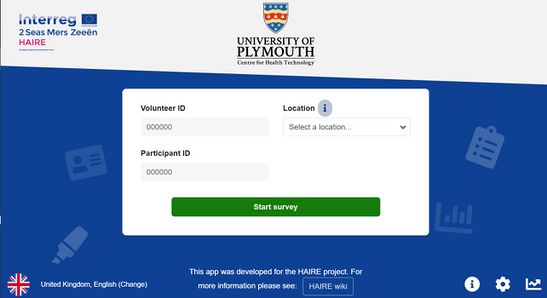
In all versions of Sociometric, the first page looks similar to the image below:
As seen above, you can select the language required at the bottom left of the screen. If it is your first time using the app, someone in your organisation will need to act as an administrator and register your location. We recommend that this administrator is also the first person that conducts the SNA survey in your location, as the survey will begin once the details (for registration) outlined below are provided.
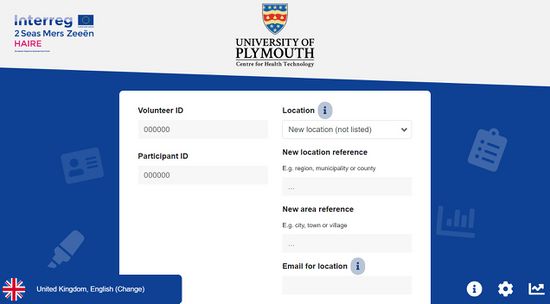
New locations can be registered via the dropdown menu that is labelled Location. Select the New location (not listed) option and the following screen should appear:
Once a screen similar to the one above is generated, the chosen administrator can enter a new location for SNA data collection. The app uses two levels to register new locations. The New location reference refers to a larger region, such as a municipality or county, and the New area reference refers to a more specific place, e.g. a city, town or village. As an example, if we were registering HAIRE's pilot site in Feock, UK, we would enter Cornwall (the county that contains Feock) into New location reference and Feock into New area reference.
After the details that are referred to above are completed, the chosen administrator will need to register their email address under Email for location. Note: no other volunteer (individuals conducting the surveys - they do not have to be volunteers) will need to enter an email address if they are collecting data for your location. The registered email address will be used to access all data for your location and the basic analysis that the tool provides.
Once an email address is entered into the relevant box, the administrator can assign themselves a volunteer number (enter this number in the Volunteer ID box) and enter an ID number for the location's first participant (enter this number in the Participant ID box). Note: more information about Participant IDs and Volunteer IDs can be found in the next sub-section. The administrator will now be ready to start the first survey for your location by clicking the Start Survey button (depicted below).
The administrator should have also received an email (sent to the registered address). This email will contain an auto-generated password that can be used to log-on to Sociometric via the boxed arrow symbol at the bottom right corner of the tool's first page (depicted below).
If you wish to create your own password, which we advise, this can be done by clicking on Forgotten password once the log-on page appears. All relevant details will be sent to the registered email address. Your registered email address and password will be needed to access your location's data and basic analysis. These details will not be required to complete more surveys for your location.
An overview of how to complete the SNA survey using the app and/or web-browser version of Sociometric is provided in Step 3.
Step 3: Conducting the SNA survey using Sociometric
Once the administrator for a location undertakes Step 2, they are ready to conduct the survey with their location's first participant.
The survey in Sociometric is based on the paper version that is available via this Wiki's main page on SNA (link to SNA main page).
In Sociometric...
Q1 asks for the participant's demographic information, e.g. age, gender and marital status. A series of dropdown boxes can be used to enter the relevant information for a participant. Once each box is completed, Q2 appears when the green arrow button (usually in the bottom right corner of the screen) is clicked.
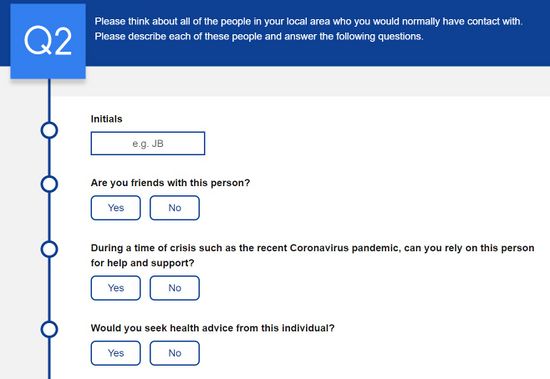
Q2 invites participants to think about the individuals whom they interact with in their local area, e.g. friends, family, neighbours etc. A series of questions, including the initials of the people mentioned by the participant, can be completed. In total, there are eight questions to answer for each person. They appear as shown below:
More individuals can be added via the Add another button that can be found at the bottom of the page. The Add another button can be seen below:
After the participant has listed everybody that they wish to, Q3 will appear when the green arrow button is clicked.
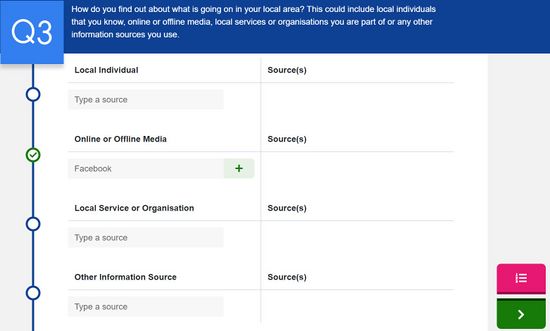
Q3 is about the sources of information that participants use to get information, e.g. about local events. Sources of information can be listed under four categories: i) local individuals, ii) offline or online media, iii) local services and organisations and iv) other. Under each category, the information sources that a participant uses can be written down and then saved by clicking the green + symbol that appears when a box is filled. See below an example - note: the green + symbol appeared beside the second box, as 'Facebook' was written as an answer for that category.
Click the green button to move on to Q4.
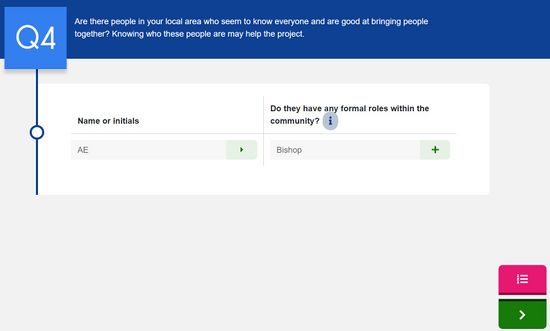
Q4 asks about key people in the local area who seem to know everyone and are good at bringing people together. Individuals can be added as a response by entering their name or initials (we recommend using initials for ease in terms of data management and privacy) and whether they have a formal role in the local community. If they do not, write None. As in Q3, a green + symbol will appear once the relevant boxes are completed. Then, more individuals can be added in the same way. See below for an example:
When everyone relevant is added as a response, the green arrow button can be clicked to move on to Q5.
Q5 is very similar to Q4 and relates to individuals who have power and/or influence in the local community. Answers can be entered in exactly the same way as for Q4 - see the image above.
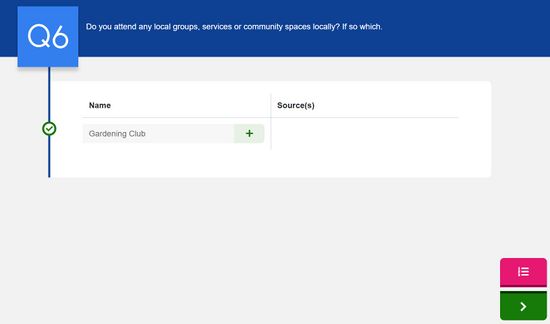
Q6 asks about the local groups and clubs that the participant attends. Answers can be written in the box that appears on the screen and saved by clicking the green + symbol. Multiple responses can be added in the same way, see below:
Q7 involves local groups and clubs that the participant would like to attend but does not currently. Answers are entered in exactly the same way as for Q6 - except a reason for not attending must be completed before the green + symbol appears. Once more, the green + symbol is used to save each answer and multiple responses can be entered.
If there are no such local groups and/or clubs, None can be written in both boxes that appear under Q7 and the answer can be saved in the same way as described above.
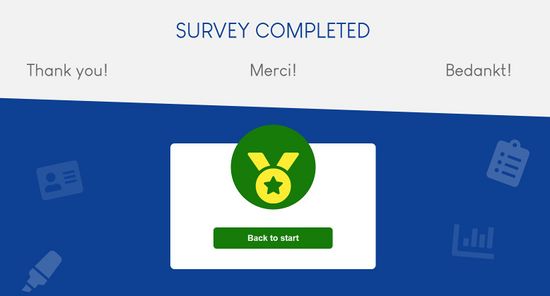
Q7 is the survey's final question. After Q7's answers are saved, the following screen will indicate that the survey is complete once the green arrow button is clicked:
Each person conducting a survey for your area will be able to do so by finding their relevant location on the survey's landing page (see Step 2), entering their ID number (under Volunteer ID) and the new participant's ID number (under Participant ID). Each survey completed for a location will contribute to the location's autogenerated SNA summary, which the administrator (see Step 2) will be able to access using their Sociometric account at any point. The next section (Step 4) describes how a location's administrator can access their location's SNA summary and the data set that has been generated by all of the surveys for that location.
Step 4: Accessing a location's SNA analysis and survey data
A location's administrator will be able to access their location's auto-generated SNA analysis by logging on to their Sociometric account. Step 2, above, outlines how to register for an account.
Administrators can log on to their account via Sociometric's landing (home) page. Account details (registered email address and password) can be used to log on to the relevant account by clicking on the button shown below:
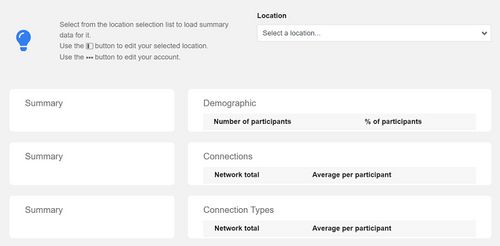
Once the administrator uses their details to log on, they will see the following page:
On the page above, the administrator will be able to select their location via the dropdown menu labelled Location (top right of screen). When the relevant location is selected, the screen will show a series of tables that summarise the following information:
- Demographic information, e.g. age, gender etc., for all participants.
- Participant connections, e.g. the average number of connections people have to others, the average number of connections that participants use for health advice, the strength of the connections and how often people interact with their connections.
- Connection types, e.g. friends, family, neighbour, work colleagues etc.
Additionally, paragraphs that summarise the data shown in the tables will appear on the left of the screen. For example, the paragraph summarising the demographic information of a location's participants will read like the sample below:
The highest gender category of participants was Female, with 1 participants representing 100.00% of participants. The majority of the participants were aged between 66-70, with 1 representing 100.00% of participants. 100.00% of participants were Widowed, 0.00% of participants were Prefer not to say & Other & Divorced & Separated, but still legally married & Married & Single.
0.00% of participants considered themselves to have a disability and the majority of participants were from a Mixed or multiple ethnic groups (Includes any mixed background) ethnicity.
Similar paragraphs (to the one above) are generated for participant connections and connection types.
The account page can also be used to extract all of the data for a location in various formats. Data extraction can be useful for performing more sophisticated analyses on the data that are collected. Note: we advise data extraction for further analysis only if users are able to work with SNA experts.
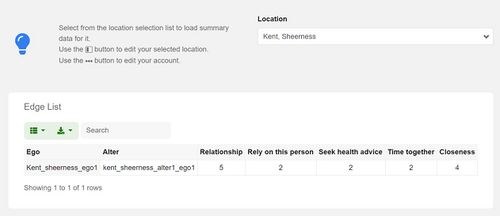
An administrator will be able to extract their location's data if they click the Export button at the top of the page that shows a location's basic analysis (as described above). The following page will appear:
Data are available for extraction across three categories.
- Edge List (as show in the example above): this category relates to the relationships that participants have in their local area.
- Attribute Table: this category relates to participants who are involved in local community groups.
- Demographic Table: this category relates to all of the demographic data that has been collected.
The administrator will be able to extract data relating to the three categories listed above by clicking the download button under each category. The download button is shown below:
Data can be extracted in the following formats: JSON, CSV, TXT, SQL and MS-Excel.
Referenties
- Guided Conversation Tips and Training, University of Exeter, University of Exeter, 23 februari 2023.
- Social Network Analysis Guidance, University of Exeter and University of Plymouth, University of Exeter and University of Plymouth, 23 februari 2023.

